The time has come. Seven weeks and three days from the day they were hatched. It was time to move the chickens from the pasture to the freezer. A small bit of work would be required to make that transition, and this time we were ready, having learned from our previous chicken butchering venture.
The process was reviewed, bottlenecks analyzed and new equipment prepared. It was go time!

Showing posts with label Urban Farming. Show all posts
Showing posts with label Urban Farming. Show all posts
Tuesday, October 16, 2012
Wednesday, September 19, 2012
Fall Meat Chickens
Summer has come and gone, and with the cooler temperatures, comes a new batch of meat chickens. As all great planners know, the ability to change plans and adapt on short notice is crucial. That is true in all facets of life, not just chicken farming. But it became relevant at the end of this summer.
The same crew that ventured out this spring on a meat chicken journey, decided that the journey was worthwhile, and worth doing again. Everything had gone well, so the plan was to follow our template on the first go around, with the small change of expanding our numbers.
The Red Rangers were ordered and all we could do was sit and wait for them to arrive at the end of July. This would give us approximately 10 weeks until Columbus Day weekend, the first weekend in October, to get them to weight for butchering.
The day came in July, and no calls that our chicks had shipped. Checking online, there was only a notice that the supplier had run into a "predator problem" and that starting the week we were supposed to get our chicks, they would be shipping no more chicks the rest of the year! Oh no! Now what?
The same crew that ventured out this spring on a meat chicken journey, decided that the journey was worthwhile, and worth doing again. Everything had gone well, so the plan was to follow our template on the first go around, with the small change of expanding our numbers.
The Red Rangers were ordered and all we could do was sit and wait for them to arrive at the end of July. This would give us approximately 10 weeks until Columbus Day weekend, the first weekend in October, to get them to weight for butchering.
The day came in July, and no calls that our chicks had shipped. Checking online, there was only a notice that the supplier had run into a "predator problem" and that starting the week we were supposed to get our chicks, they would be shipping no more chicks the rest of the year! Oh no! Now what?
Saturday, September 1, 2012
Turning a Rooster into a Meal
This past spring, we fell for the trick at the local feed supply store, where if you buy a bag of chicken feed, you get six chicks free. We split them with a friend, and they were supposed to be pullets, or female chickens. Apparently someone at the hatchery isn't very good at their job, or the feed store got a deal on chicks and didn't care what they were. Either way, the three chicks we raised and nurtured, hoping that one day they would repay the favor with fresh eggs for our family, turned out to all be roosters! All of them! Roosters!
With a flock of only 15 hens, having three roosters is at least two too many. Once we figured out that at least one was a rooster, he ended up on Craigslist. The rooster was posted just before I left for work on a Friday evening. Before I could get half way home, I already received a call. The post was very clear that I didn't care if it was for breeding or for their pot. The rooster had to go. One down.
The Oldest Son got somewhat attached to the other roosters, and was trying to convince the Good Wife and I that we should keep them, at least one. Since it was warm this summer, the windows were closed, and the chickens in their coop at 5:30 in the morning when the roosters would start to crow. Their crowing could be faintly heard if already awake, but it wasn't too strong to wake you up early. Kind of a novelty around the place, having a rooster that actually crows.
This happy, "Let's keep the roosters!" attitude all changed a couple weeks ago when they started getting aggressive and attacking the boys. One chased the Oldest Son all the way from the coop to the house. When Youngest Son went to get the eggs in the afternoon, he also go chased away from the coop. These "stories" were brushed aside. Until one chased the Good Wife. At that point, everyone else in the house was abandoning their chicken chores, and I was getting stuck having to feed them, water them and collect the eggs. The roosters had to go!
The family and the Good Wife's sister headed to Virginia Beach for Labor Day weekend so the Good Wife could run in a half marathon. I stayed home since the usual dog sitter was not available. No time like the present to "turn the roosters into a meal."
**WARNING - From this point on it is more of a pseudo tutorial on processing a chicken. Some photos may be graphic to some people. However, if you eat chicken, it is a fact of life. **
With a flock of only 15 hens, having three roosters is at least two too many. Once we figured out that at least one was a rooster, he ended up on Craigslist. The rooster was posted just before I left for work on a Friday evening. Before I could get half way home, I already received a call. The post was very clear that I didn't care if it was for breeding or for their pot. The rooster had to go. One down.
The Oldest Son got somewhat attached to the other roosters, and was trying to convince the Good Wife and I that we should keep them, at least one. Since it was warm this summer, the windows were closed, and the chickens in their coop at 5:30 in the morning when the roosters would start to crow. Their crowing could be faintly heard if already awake, but it wasn't too strong to wake you up early. Kind of a novelty around the place, having a rooster that actually crows.
This happy, "Let's keep the roosters!" attitude all changed a couple weeks ago when they started getting aggressive and attacking the boys. One chased the Oldest Son all the way from the coop to the house. When Youngest Son went to get the eggs in the afternoon, he also go chased away from the coop. These "stories" were brushed aside. Until one chased the Good Wife. At that point, everyone else in the house was abandoning their chicken chores, and I was getting stuck having to feed them, water them and collect the eggs. The roosters had to go!
The family and the Good Wife's sister headed to Virginia Beach for Labor Day weekend so the Good Wife could run in a half marathon. I stayed home since the usual dog sitter was not available. No time like the present to "turn the roosters into a meal."
**WARNING - From this point on it is more of a pseudo tutorial on processing a chicken. Some photos may be graphic to some people. However, if you eat chicken, it is a fact of life. **
Sunday, July 8, 2012
From Pasture to Freezer
The meat chicken journey has come to an end, at least for the meat chickens. It was a day filled with anticipation and apprehension. For me, it was something totally new that had never been done in the past. And before the deer hunting class, probably would have been unthinkable. But we had 95 Red Ranger meat chickens that were ready to go. Memorial Day weekend was definitely going to be memorable.
**Notice that some of the pictures that follow may be considered graphic, although they are just a part of life and death in our food chain.**
The first step consisted of gathering the chickens together. They were not supposed to eat for 18 hours before being butchered to allow time for their crops to empty so it wouldn't be so messing during the process. This meant we had to move the chicken tractor from the pasture to the concrete at the driveway. It is possible that "herding chickens" is very much in the same vein as "herding cats".
After trying to get them all collected at the moved chicken tractor, they all ended up back in the pasture. Total failure on our part.
This resulted in our having to catch them one by one and carry them into the chicken tractor on the concrete. They received lots of water and time waiting for tomorrow to arrive.
Everyone arrived at our house by 5am to start loading the chickens into the trailer. We were at the butchering facility by 6:05am. This was in anticipation of a very hot day ahead of us. We found a gentleman in our county that has a USDA inspected facility for processing chickens. He allows people to use his facility for a small fee. He teaches people how to process chickens, and then we go ahead and do the work, with him nearby if needed for any questions. It's really a pretty good setup, although if this is a USDA inspected facility, I just lost all faith in the USDA inspection process. However, I have no doubt about the cleanliness of the facility before we started. Plenty of bleach was used and I'm sure there were no germs left to cause any troubles.
After allowing about 20 minutes for the chickens to calm down after the ride in the trailer to Mr. Fitz's Playhouse, it was time to start. Mr. Fitzgerald grabbed one chicken and walked us through the initial process of putting the chickens into the kill cones, cutting their arteries and letting them bleed out. Then sticking them into the scalder and moving them into the Featherman plucker.
On a side note, the Featherman plucker is the key to making this process go smoothly. With a properly scalded chicken, about 30-40 seconds in the plucker and two chickens are in their birthday suits ready to be eviscerated.

Oldest Son did a great job along with Scott's two boys that are 13 and 15 of catching the chickens and killing them. They took pride in their work and got the job done while the rest of us did the next steps.
After a couple hours, we had over half of them killed and chilling, ready to be eviscerated. It was a milestone that we were moving along quite well.

The next step was eviscerating, where the head and feet are cut off, the guts removed and the crop along with the lungs removed from the chicken. My BIL from Knoxville was the "King of Evisceration". He was able to take a chilled chicken from whole to carcass in about a minute. Scott was a close second by the end of the day and I was a distant third.
Once we got to this point, we shifted and I moved to the rinse and inspection process before the bagging and shrink wrapping.
Mr. Fitzgerald said that a real chicken farmer would be able to eat chicken that night. After working our way through the chickens, we looked at each other and said, "Yep. I could eat chicken now!" It wasn't nearly as graphic as I had anticipated.
When we arrived, Mr. Fitzgerald said that we would be there until dark. After we got going, he said he had never seen new people work so well together and get the job done so quickly. We were finished processing, had the facility cleaned up and had 95 chickens shrink wrapped and on ice by 1:30pm.
On the way home, we realized we were short on ice, so I went to town to get some ice while Scott headed to the house to find refrigerator space for some of the chickens so the meat could "rest". On the way, I got a speeding ticket for 67 in a 45. In Virginia, this is considered Reckless Driving by Speed and is a Class 1 misdemeanor. That would give me a criminal record that would be "on my permanent record". Luckily on my court date, the judge was lenient and changed it to basic speeding. So if you happen to visit Virginia, be careful with your speed. It is considered the most expensive state to speed in. Also, anything over 80 is also considered Reckless Driving by Speed, even if the speed limit is 70.
Sunday we decided that it was time to celebrate with family and friends and try out the finished product. This included Scott and his family, my BIL from Knoxville, my BIL from north of Washington, DC, a couple of the Good Wife's friends from Lynchburg, the Good Wife's sister and one of the Good Wife's friends and her son from North Carolina. We cooked up seven Red Ranger chickens.
Some were fried whole, some were pieced, breaded and fried, and some were pieced and put on the grill.

It cooled down a bit that evening and was a great time with family and friends. That is what it is all about. Hanging out and having good food with each other.

Overall the process went smooth. The raising was simple enough, and the processing went quick. And the end result was chicken that was delicious and good for us. It went so well that we already have our chickens on order at the hatchery for this fall. We are going to be getting 151 Red Ranger roosters and letting them go for an additional five days. This should get our average dressed weight well over 4 pounds compared to the 3.75 pounds we averaged this time.
It is a life skill that Oldest Son has now inherited and something I anticipate continuing on a regular basis. The best part is that the license plate on the car that the Good Wife usually drives came up for renewal. I took the opportunity to show our enthusiasm for this whole process. Although the Good Wife isn't so happy for the change since she is the one getting the comments!

Stay tuned for a follow-up post of all the ways the Red Ranger's have been cooked. Any way they are prepared, they are delicious!
**Notice that some of the pictures that follow may be considered graphic, although they are just a part of life and death in our food chain.**
The first step consisted of gathering the chickens together. They were not supposed to eat for 18 hours before being butchered to allow time for their crops to empty so it wouldn't be so messing during the process. This meant we had to move the chicken tractor from the pasture to the concrete at the driveway. It is possible that "herding chickens" is very much in the same vein as "herding cats".
 |
| Scott using a stick and broom to try and "herd" the chickens. |
After trying to get them all collected at the moved chicken tractor, they all ended up back in the pasture. Total failure on our part.
 |
| Chickens back in the pasture enjoying their last clover meal. |
This resulted in our having to catch them one by one and carry them into the chicken tractor on the concrete. They received lots of water and time waiting for tomorrow to arrive.
Everyone arrived at our house by 5am to start loading the chickens into the trailer. We were at the butchering facility by 6:05am. This was in anticipation of a very hot day ahead of us. We found a gentleman in our county that has a USDA inspected facility for processing chickens. He allows people to use his facility for a small fee. He teaches people how to process chickens, and then we go ahead and do the work, with him nearby if needed for any questions. It's really a pretty good setup, although if this is a USDA inspected facility, I just lost all faith in the USDA inspection process. However, I have no doubt about the cleanliness of the facility before we started. Plenty of bleach was used and I'm sure there were no germs left to cause any troubles.
 |
| Processing facility - AKA Mr. Fitz's Playhouse |
After allowing about 20 minutes for the chickens to calm down after the ride in the trailer to Mr. Fitz's Playhouse, it was time to start. Mr. Fitzgerald grabbed one chicken and walked us through the initial process of putting the chickens into the kill cones, cutting their arteries and letting them bleed out. Then sticking them into the scalder and moving them into the Featherman plucker.
On a side note, the Featherman plucker is the key to making this process go smoothly. With a properly scalded chicken, about 30-40 seconds in the plucker and two chickens are in their birthday suits ready to be eviscerated.

Oldest Son did a great job along with Scott's two boys that are 13 and 15 of catching the chickens and killing them. They took pride in their work and got the job done while the rest of us did the next steps.
 |
| Oldest son using the kill cones to dispatch the chickens. |
After a couple hours, we had over half of them killed and chilling, ready to be eviscerated. It was a milestone that we were moving along quite well.

The next step was eviscerating, where the head and feet are cut off, the guts removed and the crop along with the lungs removed from the chicken. My BIL from Knoxville was the "King of Evisceration". He was able to take a chilled chicken from whole to carcass in about a minute. Scott was a close second by the end of the day and I was a distant third.
Once we got to this point, we shifted and I moved to the rinse and inspection process before the bagging and shrink wrapping.
 |
| A processed chicken ready for bagging. |
Mr. Fitzgerald said that a real chicken farmer would be able to eat chicken that night. After working our way through the chickens, we looked at each other and said, "Yep. I could eat chicken now!" It wasn't nearly as graphic as I had anticipated.
When we arrived, Mr. Fitzgerald said that we would be there until dark. After we got going, he said he had never seen new people work so well together and get the job done so quickly. We were finished processing, had the facility cleaned up and had 95 chickens shrink wrapped and on ice by 1:30pm.
On the way home, we realized we were short on ice, so I went to town to get some ice while Scott headed to the house to find refrigerator space for some of the chickens so the meat could "rest". On the way, I got a speeding ticket for 67 in a 45. In Virginia, this is considered Reckless Driving by Speed and is a Class 1 misdemeanor. That would give me a criminal record that would be "on my permanent record". Luckily on my court date, the judge was lenient and changed it to basic speeding. So if you happen to visit Virginia, be careful with your speed. It is considered the most expensive state to speed in. Also, anything over 80 is also considered Reckless Driving by Speed, even if the speed limit is 70.
Sunday we decided that it was time to celebrate with family and friends and try out the finished product. This included Scott and his family, my BIL from Knoxville, my BIL from north of Washington, DC, a couple of the Good Wife's friends from Lynchburg, the Good Wife's sister and one of the Good Wife's friends and her son from North Carolina. We cooked up seven Red Ranger chickens.
 |
| First chicken getting fried. |
Some were fried whole, some were pieced, breaded and fried, and some were pieced and put on the grill.

It cooled down a bit that evening and was a great time with family and friends. That is what it is all about. Hanging out and having good food with each other.

Overall the process went smooth. The raising was simple enough, and the processing went quick. And the end result was chicken that was delicious and good for us. It went so well that we already have our chickens on order at the hatchery for this fall. We are going to be getting 151 Red Ranger roosters and letting them go for an additional five days. This should get our average dressed weight well over 4 pounds compared to the 3.75 pounds we averaged this time.
It is a life skill that Oldest Son has now inherited and something I anticipate continuing on a regular basis. The best part is that the license plate on the car that the Good Wife usually drives came up for renewal. I took the opportunity to show our enthusiasm for this whole process. Although the Good Wife isn't so happy for the change since she is the one getting the comments!

Stay tuned for a follow-up post of all the ways the Red Ranger's have been cooked. Any way they are prepared, they are delicious!
Tuesday, October 18, 2011
Fresh Eggs
Fresh eggs are hard to beat. Everyone said that once you get used to fresh eggs, you'll never want to eat a store bought egg again. The first fresh eggs we ate was good, but it had a unique taste. More than just having a unique taste, it had a taste. Store bought eggs are more of an egg looking item that just takes up space.
Fresh eggs have such bright yolks. It is one of the things you notice right away with fresh eggs. After a little while, you get used to it, and then when you end up at a hotel buffet with scrambled eggs, you notice the dull color of the eggs languishing in the Sterno heated tray.
 |
| Fresh eggs to go with the pancakes. |
The exciting thing is that we seem to get more double yolks than with store bought eggs. Not sure if that means we have defective chickens, or they are still getting their systems figured out with this whole egg laying thing.
The main point of this post is how easy it is to have a few chickens and get some fresh eggs on a daily basis. While living in Phoenix we had thought about having chickens but were weary about all that was involved. In reality, we could have made a Chicken Condo like the one we have here, changed the door to a ramp underneath the coop and closed in the bottom with chicken wire and we would have been set. It would have been a perfect home to two or three chickens. Why did we wait so long?
Monday, September 26, 2011
Chicken Gone!!
This chicken thing is fun and frustrating all at the same time. Fun is seeing them grow up from chicks and get to know us, so that they come running to me when I get home from work. Fun in lifting the lid on the nesting boxes and finding fresh eggs waiting for us every day. Fun in listening to them talk to each other and us as they wander around the yard, eating bugs and grass, free-ranging to their hearts content.
Frustrating in watching them wander over to the neighbor's yard and hang out over there. Frustrating in watching them start to roost in the Guinea Ghetto instead of the wonderful Chicken Condo I created for them. Frustrating in watching them disappear, which is what happened this time.
At last count, we were seven chickens and one guinea. One of the Black Australorp chickens went missing. This time there was no evidence as to what my have happened. No feather trail through the yard like there was when we lost four of the guineas. Nothing. Not a trace.
The feathers on the Black Australorps have a green tint when the sun reflects off them. They are really a good looking chicken. We started with pairs, and now the Black Australorp and Buff Orpington are singles. The Ameracauna and Barred Rock chickens are still pairs. Not that it matters since they are all hens and all seem to get along fine.
The most disappointing part is that they are all laying eggs, so we were getting a solid seven eggs a day, and now we are down to six a day. Nothing to shake a stick at, but one less than before. We're a little more cautious now with the chickens, keeping them in the run if we are going to be gone all morning and letting them out in the afternoon when we are home. This seems to keep them closer to the house than if we let them out first thing in the morning. It seems to be working and they are all hanging around closer to the house. Hopefully, this means we will be at a steady six eggs a day until winter comes.
Frustrating in watching them wander over to the neighbor's yard and hang out over there. Frustrating in watching them start to roost in the Guinea Ghetto instead of the wonderful Chicken Condo I created for them. Frustrating in watching them disappear, which is what happened this time.
At last count, we were seven chickens and one guinea. One of the Black Australorp chickens went missing. This time there was no evidence as to what my have happened. No feather trail through the yard like there was when we lost four of the guineas. Nothing. Not a trace.
 |
| Last Black Australop left in the flock. |
The feathers on the Black Australorps have a green tint when the sun reflects off them. They are really a good looking chicken. We started with pairs, and now the Black Australorp and Buff Orpington are singles. The Ameracauna and Barred Rock chickens are still pairs. Not that it matters since they are all hens and all seem to get along fine.
The most disappointing part is that they are all laying eggs, so we were getting a solid seven eggs a day, and now we are down to six a day. Nothing to shake a stick at, but one less than before. We're a little more cautious now with the chickens, keeping them in the run if we are going to be gone all morning and letting them out in the afternoon when we are home. This seems to keep them closer to the house than if we let them out first thing in the morning. It seems to be working and they are all hanging around closer to the house. Hopefully, this means we will be at a steady six eggs a day until winter comes.
Saturday, July 23, 2011
Poultry Watering System
A little while back, after reading a bit on the forum of Back Yard Chickens, I bought some poultry nipples from QC Supply. The Oldest Son thought the name of them was funny. Every time the words "poultry nipples" were mentioned, he would get this silly grin on his face and laugh. I'm not sure if he was trying to picture nipples on a chicken or what he had in mind. But he really thought it was funny.
After having the poultry nipples for a few weeks without doing anything, it was time to get started. This is the first time I am trying to do a step by step process so someone else can learn how to do it, so please, bear with me.
First, a few supplies were needed. A piece of 1" schedule 40 PVC pipe, some end connectors, some tubing and an empty bucket. Everything was purchased, except the bucket, which I got from the bakery at the local Kroger bakery. Someone on the chicken forum said about getting buckets at the bakery, so I went and asked. Surprisingly, they went into the back room and came back with three buckets with lids for free. You CAN get something for free these days!
Next the tools were gathered together. This was so that everything would be on hand when needed, and I wouldn't have to go all around looking for tools.
Cordless drill with 11/32" drill bit, PVC pipe cutter, PVC pipe primer and glue, teflon tape, measuring tape, pencil and an open end wrench (can't remember the size, but it fit the poultry nipples).

The PVC pipe was cut to the length that was needed for the waterer. I made two watering systems. One has three poultry nipples and one has six poultry nipples. I spaced the poultry nipples 10" apart, which seems to work well. So after marking the 10" point, a 11/32" hole was drilled at each mark.

The poultry nipples were then wrapped with teflon tape, to make sure that they didn't leak once installed. You can never have enough insurance on avoiding leaks. The next step is to screw all the poultry nipples into the holes in the PVC pipe.

Easier said than done. A few went in easily and threaded really nice. The rest were a real struggle to get in. One other thing to note, be sure to try and keep the poultry nipples in a straight line so they are all pointing the same direction. I know this should be assumed, but you never know.
One trick used on the second system I made, was to use a propane torch to help get the poultry nipples threaded. Using a propane torch, I heated up the hole in the PVC pipe to make the pipe soft. Just make sure you don't over heat it and deform the hole. Then I threaded in a poultry nipple without teflon tape, and then removed the nipple after a minute once the PVC pipe cooled. That left nice threads in the hole to put the nipple into once it had the teflon tape.
After putting on the end connectors, the main portion of the watering system is complete. I used more connectors than was necessary on the ends so I could unscrew the end and clean out the waterer if necessary. After having it going for a month or so now, I think that was overkill as it is staying really nice and clean, even in the summer heat.

The bucket had a hole drilled in the bottom and a PVC connector was installed. Then it was about installing the system in the chicken run. I put one inside the run and one on the outside. That would allow both free-ranging birds and birds in the run to both get a drink, not knowing at the time what was going to work.
The poultry nipples were installed approximately 19" off the ground as that is how big my chickens were when I installed it. That allows them to look up and get a drink. Be sure to install it with the hose end slightly higher than the closed end, so the air will flow up and go up into the bucket, allowing all the nipples to drain water.

Now, with this system, I only have to fill the frosting bucket about every two weeks, with my nine birds. When you can eliminate all the wasted water and the dirty water in the other watering dishes, they actually don't drink that much water. It may also be due to the fact that all my chickens and guineas free-range all day and are able to get water from the dew on the ground in the mornings.
Whatever the situation, I highly recommend a watering system such as this. It makes it so much easier to water the birds and eliminates a lot of time dealing with the traditional watering trays. It also has to be better for the birds since it is always clean water they are drinking.

Hopefully these instructions were clear enough to give you the basics of how to make a similar system. If you have any questions or feedback on a system that you have made, be sure to let me know.
After having the poultry nipples for a few weeks without doing anything, it was time to get started. This is the first time I am trying to do a step by step process so someone else can learn how to do it, so please, bear with me.
First, a few supplies were needed. A piece of 1" schedule 40 PVC pipe, some end connectors, some tubing and an empty bucket. Everything was purchased, except the bucket, which I got from the bakery at the local Kroger bakery. Someone on the chicken forum said about getting buckets at the bakery, so I went and asked. Surprisingly, they went into the back room and came back with three buckets with lids for free. You CAN get something for free these days!
 |
| Chicken Waterer Parts |
 |
| Tools for making the chicken waterer. |
Cordless drill with 11/32" drill bit, PVC pipe cutter, PVC pipe primer and glue, teflon tape, measuring tape, pencil and an open end wrench (can't remember the size, but it fit the poultry nipples).

The PVC pipe was cut to the length that was needed for the waterer. I made two watering systems. One has three poultry nipples and one has six poultry nipples. I spaced the poultry nipples 10" apart, which seems to work well. So after marking the 10" point, a 11/32" hole was drilled at each mark.

The poultry nipples were then wrapped with teflon tape, to make sure that they didn't leak once installed. You can never have enough insurance on avoiding leaks. The next step is to screw all the poultry nipples into the holes in the PVC pipe.

Easier said than done. A few went in easily and threaded really nice. The rest were a real struggle to get in. One other thing to note, be sure to try and keep the poultry nipples in a straight line so they are all pointing the same direction. I know this should be assumed, but you never know.
One trick used on the second system I made, was to use a propane torch to help get the poultry nipples threaded. Using a propane torch, I heated up the hole in the PVC pipe to make the pipe soft. Just make sure you don't over heat it and deform the hole. Then I threaded in a poultry nipple without teflon tape, and then removed the nipple after a minute once the PVC pipe cooled. That left nice threads in the hole to put the nipple into once it had the teflon tape.
After putting on the end connectors, the main portion of the watering system is complete. I used more connectors than was necessary on the ends so I could unscrew the end and clean out the waterer if necessary. After having it going for a month or so now, I think that was overkill as it is staying really nice and clean, even in the summer heat.
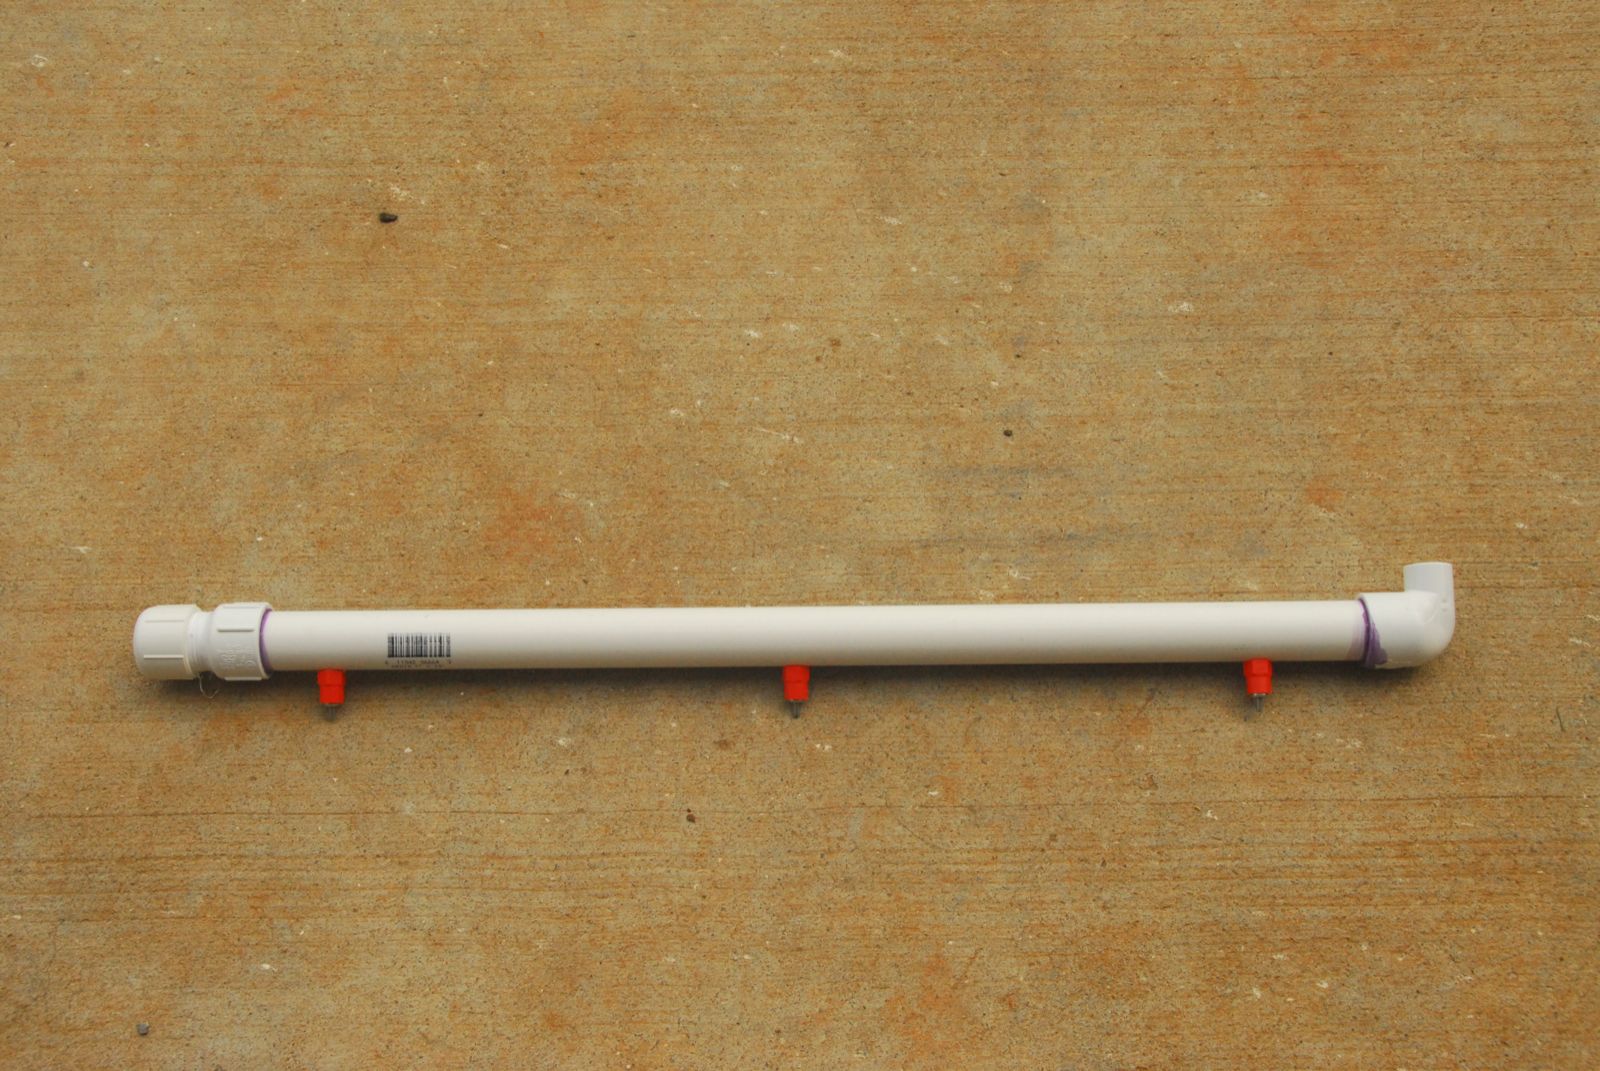
The bucket had a hole drilled in the bottom and a PVC connector was installed. Then it was about installing the system in the chicken run. I put one inside the run and one on the outside. That would allow both free-ranging birds and birds in the run to both get a drink, not knowing at the time what was going to work.
The poultry nipples were installed approximately 19" off the ground as that is how big my chickens were when I installed it. That allows them to look up and get a drink. Be sure to install it with the hose end slightly higher than the closed end, so the air will flow up and go up into the bucket, allowing all the nipples to drain water.

Now, with this system, I only have to fill the frosting bucket about every two weeks, with my nine birds. When you can eliminate all the wasted water and the dirty water in the other watering dishes, they actually don't drink that much water. It may also be due to the fact that all my chickens and guineas free-range all day and are able to get water from the dew on the ground in the mornings.
 |
| Water drops on the PVC is from rain. |
Whatever the situation, I highly recommend a watering system such as this. It makes it so much easier to water the birds and eliminates a lot of time dealing with the traditional watering trays. It also has to be better for the birds since it is always clean water they are drinking.

Hopefully these instructions were clear enough to give you the basics of how to make a similar system. If you have any questions or feedback on a system that you have made, be sure to let me know.
Thursday, July 21, 2011
First egg...from a chicken!!

Doesn't it look beautiful? I never thought I would be so excited about something so simple. Wednesday we left the chickens in the run most of the day until I got home from work and let them free-range for a little bit before dark, but nothing. Today I let them out of the coop before I left for work thinking they must not be ready yet.
Tonight when I went down to the run to close it up for the evening, I opened up the lid of the nesting boxes and there it was, tucked down in the corner of the straw. Not the biggest egg, but it is the first. No idea which chicken laid the egg, but it is a start. Let the eggs begin!!
Thursday, April 7, 2011
Getting the garden going early.
The good wife and I were cruising the Home Depot one evening, having a nice date out on the town, and we came across a kit for a grow light that was made by one of the employees named Kevin. He had set up a cart showing all the parts that would be needed, and had sheets printed out showing how to build it and what to do to start your garden indoors. Kevin was there this night and was more than happy and willing to help out some naive transplants, I mean customers. We picked his brain for about an hour about what we should be doing with our yard, what we should do with our shrubs, our trees, what grows here and when. He even told us about his blog about his gardening called KevInTheGarden. But the big discussion was about the garden. Since we moved here in June last year, we were a little late getting started, but we were still able to get a few raised beds made and got a few items planted.
But this year was going to be different. We got another volunteer neighbor of ours to come and rototill a small portion of our yard next to the raised beds for an in-ground garden. Then we went to another neighbors house just down the road for some composted horse manure. She puts all the horse manure from her horses into small piles just inside the woods next to her barn. When we told her we were working on a garden, she offered all the manure we could want. We got our buckets and shovels and headed over to her piles. It was amazing! Push the shovel into a pile covered with leaves and a nice dark rich compost comes up, light and fluffy, just what our garden needs. We added a couple bags of lime to help break up the clay, and then one more tilling of the soil by our volunteer neighbor to blend it all together. Our garden was ready to go!
But the weather wasn't. We were still a bit early. So off I went to the Home Depot to buy the grow light kit. Basically a two bulb shop light and some PVC pipe. It was a really simple assembly and we were off and growing in our basement.
Our volunteer neighbor's wife is an avid gardener, so she pointed us towards a local seed company called Southern Exposure Seed Exchange. The package came the next week and the seeds were planted. It only took a couple days to get the seeds germinating and the seedlings were on their way.
It has continued to be cold here in Goochland, VA the last week or two. The good wife was able to get the peas planted outside in the garden since they are more cold hardy and will tolerate a good frost.
It's been a long, long time since I have had home grown peas. My mouth is watering thinking how they will taste like little bits of candy. (Can't we all hear our parents saying that their vegetables taste "as sweet as candy" from when we were kids? Now I know what they meant!)
 |
| First year raised beds. |
But this year was going to be different. We got another volunteer neighbor of ours to come and rototill a small portion of our yard next to the raised beds for an in-ground garden. Then we went to another neighbors house just down the road for some composted horse manure. She puts all the horse manure from her horses into small piles just inside the woods next to her barn. When we told her we were working on a garden, she offered all the manure we could want. We got our buckets and shovels and headed over to her piles. It was amazing! Push the shovel into a pile covered with leaves and a nice dark rich compost comes up, light and fluffy, just what our garden needs. We added a couple bags of lime to help break up the clay, and then one more tilling of the soil by our volunteer neighbor to blend it all together. Our garden was ready to go!
 |
| The section of our yard that we call "The Garden." |
But the weather wasn't. We were still a bit early. So off I went to the Home Depot to buy the grow light kit. Basically a two bulb shop light and some PVC pipe. It was a really simple assembly and we were off and growing in our basement.
 |
| The grow light in action, helping the seedlings reach to the sky in the basement. |
Our volunteer neighbor's wife is an avid gardener, so she pointed us towards a local seed company called Southern Exposure Seed Exchange. The package came the next week and the seeds were planted. It only took a couple days to get the seeds germinating and the seedlings were on their way.
It has continued to be cold here in Goochland, VA the last week or two. The good wife was able to get the peas planted outside in the garden since they are more cold hardy and will tolerate a good frost.
 |
| First row of peas planted and ready to grow. |
It's been a long, long time since I have had home grown peas. My mouth is watering thinking how they will taste like little bits of candy. (Can't we all hear our parents saying that their vegetables taste "as sweet as candy" from when we were kids? Now I know what they meant!)
Monday, March 21, 2011
The Chicken Condo
I'm not sure what it is about this fresh country air that makes me want to go outside and build something. Last fall I got it in my head that we were going to have chickens so that we could go outside and get some fresh eggs whenever we wanted. I didn't know the first thing about chickens and have never raised a chicken in my life. My wife had at least seen them processed for dinner while growing up in Morocco. She was one step ahead of me.
So I took the first logical step and headed to the internet. It is amazing the amount of information that you can find about raising chickens on the internet. The two best websites I found that have the most information and the friendliest people on the internet are East Coast Chickens and Backyard Chickens. East Coast Chickens is just a forum, but it is a lot of local people in the greater Richmond, VA area, so they are raising chickens in the same conditions that I would be taking on. Backyard Chickens has the most general information, about all things fowl, not just chickens. They also have a great forum with an amazing number of participants all across the country. If you can't find something there, then it doesn't exist!
The one theme that came across on all the websites I visited was that I should have their permanent home built before I bought chicks, because it always takes longer than you think, and the chicks grow up quicker than you think. Apparently once you buy chicks, your time estimation skills are ruined. Taking this to heart, I decided that was a project I should start.
After going online and finding all sorts of websites trying to sell plans, forums showing sketches and pictures, I had a general idea of what I wanted. I even went onto Google SketchUp to see if anyone had posted any plans. After printing out a bunch of ideas from SketchUp and various other websites, I sketched out some rough plans for my coop. The next step? Home Depot! You can only plan so long before starting to build.

A nice 4'x4' base seemed like a good place to start. A nice foundation to build up from. And build I did. (I apologize for not having a full set of pictures and plans, but I built this before I started my blog, so I didn't have this process in mind.)

My youngest son decided to join in the fun, and told me that if the whole chicken thing didn't work out, could he use it as a fort. This gave me an out of the chickens didn't work out, which at one point, I was glad I had! I continued to read on the internet when I had the chance and build the coop at night and on weekends. I'm glad I listened to the advice of all the random people on the internet, because it took me about 6-8 weeks to build my coop, but it was finally done!


It even has electricity and a built in light for the winter when the chickens need more light to keep laying eggs. Another tidbit gleaned from the internet. I also put an electrical outlet inside in case I need to plug in a water warmer for winter or a heat lamp if I use it as a brooder in the future. It has two front windows that open with screens, a rear vent, three nesting boxes with a lid that opens from the outside for easy egg access, a side chicken door to let the chickens out and a side human door for easy access to feed and water. But the one thing I am most proud of is the poop door.

The poop door provides quick and easy access to the poop tray. Everyone on the internet said that cleaning the coop was the most difficult task, and anything that could be done to make it easier would let you enjoy your chickens, and eggs, that much more. So I built a tray with walls on three sides to hold the pine shavings, and covered it in linoleum. That way, when it is time to clean the coop, I can pull my garden trailer or wheel barrow up to the side of the coop, slide out the poop tray and scrape all the used pine shavings into the trailer. Then slide the tray back into the coop, close the poop door, and put down a new layer of nice clean pine shavings. I am assuming that once the chickens see the luxury condo that I built for them, they will be happy chickens and gladly produce nice large brown eggs for my family. In theory, this all makes sense. Once I put the chickens in there, it may all go out the window.
So now I had a beautiful chicken coop in my garage. My friend Dave from Phoenix stopped by to visit in early November, and after admiring my coop, asked why it was in the garage. With him there and willing, it seemed like an appropriate time to move the coop from the garage to the yard. After scooting the coop to the edge of the garage, and I say scoot because that is about all we could do, we needed a new way to move it. I hadn't just built a chicken coop, I built an anchor. That coop weighed 400 pounds, at least that is what it felt like!

We decided that we would jack it up, back up the truck, put on the motorcycle hitch carrier and then lower the coop onto the carrier for the ride down to where it would sit in the yard. After about an hour of jacking up the coop and getting the hitch carrier under it, we were ready to lower the coop. We started to lower it down, waiting for the carrier to hold it. We kept lowering it, kept lowering it, kept lowering it, and finally when the coop touched the ground, figured that even though the hitch carrier is rated at a distributed 400 pounds, it wasn't going to be strong enough to hold the coop. How much does this thing weigh?! Maybe my first estimate was accurate. I didn't have the chicks yet, so apparently my estimating skills were still intact. We needed a plan B, aka, the neighbor.
My neighbor isn't just your average neighbor, he owns an excavating company. And what do excavating companies use? Heavy machinery!

He just happened to have a large tracked diesel bobcat at his house that weekend. And not just any bobcat, but one with forks! He gladly came right over, lifted up the coop with ease and motored it down into the yard. Thanks Clay!

It sure seemed bigger and heavier in the garage than down in the corner of the yard. But there it sat, in all it's red and white farm glory, waiting for the chickens. Ready to be the centerpiece of my urban farming adventure.
So I took the first logical step and headed to the internet. It is amazing the amount of information that you can find about raising chickens on the internet. The two best websites I found that have the most information and the friendliest people on the internet are East Coast Chickens and Backyard Chickens. East Coast Chickens is just a forum, but it is a lot of local people in the greater Richmond, VA area, so they are raising chickens in the same conditions that I would be taking on. Backyard Chickens has the most general information, about all things fowl, not just chickens. They also have a great forum with an amazing number of participants all across the country. If you can't find something there, then it doesn't exist!
The one theme that came across on all the websites I visited was that I should have their permanent home built before I bought chicks, because it always takes longer than you think, and the chicks grow up quicker than you think. Apparently once you buy chicks, your time estimation skills are ruined. Taking this to heart, I decided that was a project I should start.
After going online and finding all sorts of websites trying to sell plans, forums showing sketches and pictures, I had a general idea of what I wanted. I even went onto Google SketchUp to see if anyone had posted any plans. After printing out a bunch of ideas from SketchUp and various other websites, I sketched out some rough plans for my coop. The next step? Home Depot! You can only plan so long before starting to build.

A nice 4'x4' base seemed like a good place to start. A nice foundation to build up from. And build I did. (I apologize for not having a full set of pictures and plans, but I built this before I started my blog, so I didn't have this process in mind.)

My youngest son decided to join in the fun, and told me that if the whole chicken thing didn't work out, could he use it as a fort. This gave me an out of the chickens didn't work out, which at one point, I was glad I had! I continued to read on the internet when I had the chance and build the coop at night and on weekends. I'm glad I listened to the advice of all the random people on the internet, because it took me about 6-8 weeks to build my coop, but it was finally done!

I know, the red and white are a farm cliche, but it was my first new building on my property and it seemed fitting. My wife even picked out the red color for me.

It even has electricity and a built in light for the winter when the chickens need more light to keep laying eggs. Another tidbit gleaned from the internet. I also put an electrical outlet inside in case I need to plug in a water warmer for winter or a heat lamp if I use it as a brooder in the future. It has two front windows that open with screens, a rear vent, three nesting boxes with a lid that opens from the outside for easy egg access, a side chicken door to let the chickens out and a side human door for easy access to feed and water. But the one thing I am most proud of is the poop door.

The poop door provides quick and easy access to the poop tray. Everyone on the internet said that cleaning the coop was the most difficult task, and anything that could be done to make it easier would let you enjoy your chickens, and eggs, that much more. So I built a tray with walls on three sides to hold the pine shavings, and covered it in linoleum. That way, when it is time to clean the coop, I can pull my garden trailer or wheel barrow up to the side of the coop, slide out the poop tray and scrape all the used pine shavings into the trailer. Then slide the tray back into the coop, close the poop door, and put down a new layer of nice clean pine shavings. I am assuming that once the chickens see the luxury condo that I built for them, they will be happy chickens and gladly produce nice large brown eggs for my family. In theory, this all makes sense. Once I put the chickens in there, it may all go out the window.
So now I had a beautiful chicken coop in my garage. My friend Dave from Phoenix stopped by to visit in early November, and after admiring my coop, asked why it was in the garage. With him there and willing, it seemed like an appropriate time to move the coop from the garage to the yard. After scooting the coop to the edge of the garage, and I say scoot because that is about all we could do, we needed a new way to move it. I hadn't just built a chicken coop, I built an anchor. That coop weighed 400 pounds, at least that is what it felt like!

We decided that we would jack it up, back up the truck, put on the motorcycle hitch carrier and then lower the coop onto the carrier for the ride down to where it would sit in the yard. After about an hour of jacking up the coop and getting the hitch carrier under it, we were ready to lower the coop. We started to lower it down, waiting for the carrier to hold it. We kept lowering it, kept lowering it, kept lowering it, and finally when the coop touched the ground, figured that even though the hitch carrier is rated at a distributed 400 pounds, it wasn't going to be strong enough to hold the coop. How much does this thing weigh?! Maybe my first estimate was accurate. I didn't have the chicks yet, so apparently my estimating skills were still intact. We needed a plan B, aka, the neighbor.
My neighbor isn't just your average neighbor, he owns an excavating company. And what do excavating companies use? Heavy machinery!

He just happened to have a large tracked diesel bobcat at his house that weekend. And not just any bobcat, but one with forks! He gladly came right over, lifted up the coop with ease and motored it down into the yard. Thanks Clay!

It sure seemed bigger and heavier in the garage than down in the corner of the yard. But there it sat, in all it's red and white farm glory, waiting for the chickens. Ready to be the centerpiece of my urban farming adventure.
Sunday, March 6, 2011
Introduction
Since I moved from Phoenix to Virginia, I have been saying that I was going to start a blog so that all my friends could keep track of what I am doing. I have talked a lot about it, but not much action has followed. Now that Starr says, "I am embracing my country lifestyle." I figure I better get going or I will have too much to say at once.
I have always said that I am a "Jack of all trades, master of none." This shows up in my diversified list of interests, from bee keeping to dirt bikes, raising chickens to photography, sustainable living to wakeboarding. This blog will be a place that I can talk about all my interests, and immerse you in my thoughts. (Don't worry, they aren't that deep, so you shouldn't drown.) This will also be a place to show you the projects I am working on and what I have learned from them. It will hopefully be informative, and at least be entertaining.
This is the continuing saga of how I am becoming...The Haphazard Countryman.
I have always said that I am a "Jack of all trades, master of none." This shows up in my diversified list of interests, from bee keeping to dirt bikes, raising chickens to photography, sustainable living to wakeboarding. This blog will be a place that I can talk about all my interests, and immerse you in my thoughts. (Don't worry, they aren't that deep, so you shouldn't drown.) This will also be a place to show you the projects I am working on and what I have learned from them. It will hopefully be informative, and at least be entertaining.
This is the continuing saga of how I am becoming...The Haphazard Countryman.
Subscribe to:
Posts (Atom)